Crafting Miniatures: Starting Out Small

Dollhouses can be a way of scaling down extravagance. Part of what drew me to miniatures -- as an adult -- was that this was a craft where you could create virtually anything with little overhead and little cost. You could imitate countless objects from real life. It took just a little fabric, just a smidgeon of clay. It was home decorating on a budget. It was serious thrift.
In those early years, I might have taken my thrift to an extreme. I made it hard on myself. Projects progressed slowly. Sticky things unstuck.
I was lucky, though, to have a beautiful place to store miniatures: a cabinet that I painted faux verdigris. A cabinet is less likely to turn into clutter than a shadow box. Paint it up pretty on the outside, and it's willing to let you take your time with the furnishings.
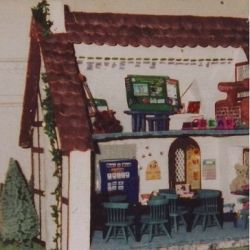
A little over a decade ago, inspired by a contest, I put together what might well have been my first project had I been willing to shell out a few more dollars at the onset. It was 'Mount Rainier Primary School', built from the ground up from a Sugarplum Cottage dollhouse kit. (Some people might recognize from the photo that there was a bit of teacher catalog cutting that went on... with gratitude to Lakeshore Learning for the little 'word wall' words and the 'Busy Bee' helper chart.)
About the same time, I got the shell of a very large dollhouse at a thrift store. Now that's an ongoing project -- especially when I also have projects to do for my nieces!
Here's some of what I've learned over the years, including when to cut corners... and when to buy something to hold the corners together.
Images by the author of the page
First Project: A Place to Call Home
Click thumbnail to view full-size

The ideal first project is creating the place where you will display it all. One option is the cabinet -- especially if you have an old cabinet laying around.
My first 'dollhouse' worked well. The shelves measured a little over eight inches. That translated to close to eight-and-a-half inches in dollhouse scale. The floors were perfect rectangles, which made for easy carpeting.
Since it was not quite a replica of a real life house, it didn't need every hard-to-create room. It wasn't necessary to create or buy bathroom furniture. No, the rooms were shaped by whimsy... and by the materials on hand. None of the furniture was built by hand. Most was refinished: hand painted, decoupaged, antiqued, or treated to fake verdigris or green serpentine marble.
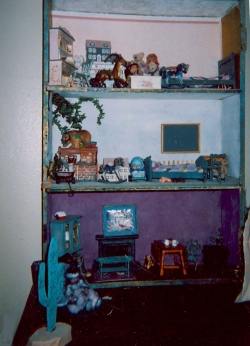
The cabinet housed my miniature collection throughout my twenties. Ah, but a person can't stay in their first home forever. Eventually it's time to buy a house.
Waste not... That cabinet is still around. Can you spy it in its newest (fourth? fifth?) incarnation?
Kits: Making Peace with Punch Out Plywood
It's also quite doable to begin with a small dollhouse kit. It's the cheaper option if you don't have an old cabinet.
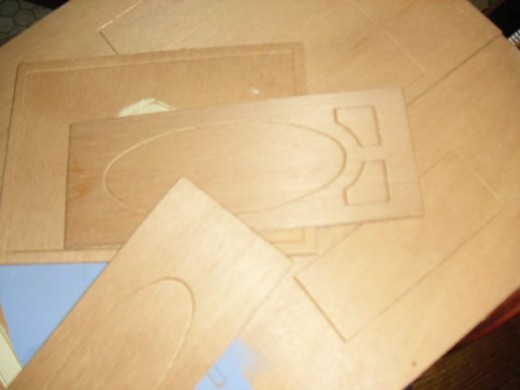
If you don't think well in 3-D, or just want to begin with something simple, it can be good to make peace with punch-out plywood. Punch-out plywood kits are more intuitive than most dollhouse kits. There are fewer little pieces. You may find a whole wall there in front of you in a single recognizable piece. And (big bonus!) many pieces have little notches to help fit them together.
The downside is that they're not so realistic unless you use a few items that aren't included in the kit.
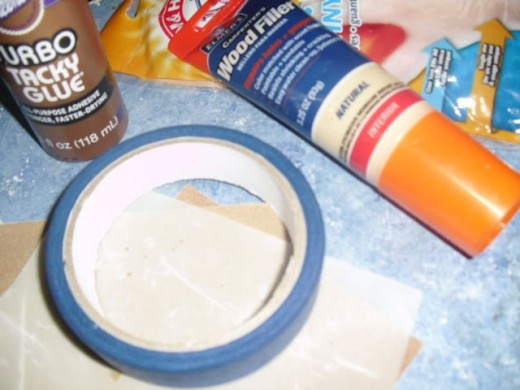
Here are the basic materials you'll want in the early stages of construction.
- Have wood filler on hand. There are apt to be some little gaps when you fit the walls together. The tabs themselves can be distracting to the eye. Wood filler goes a long way toward masking these imperfections: Apply it liberally. smooth it out,and later you can sand it. The preliminary sanding can be done after just a few minutes.
- You'll want some very tacky craft glue and some masking tape. Otherwise, you may get tempted to pull out the hot glue gun. Don't! It bonds things too quickly. You are apt to get globs of glue that are very visible and near impossible to sand. Masking tape will help hold your pieces together while your glue sets.
- It's not a necessity, but you may well want some latex or vinyl gloves. The texture of punch-out plywood... well, it doesn't necessarily feel good to the hands.
- And don't forget that sandpaper!
A Near Necessity for Realism: Stucco
Click thumbnail to view full-size

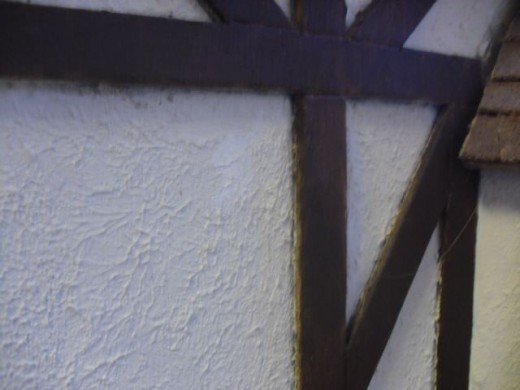
Both Mount Rainier Primary and the big dollhouse were finished with American Stucco craft stucco. It is very forgiving. By that, I mean you can work over it a bit after you apply it. If you continue to work over it, it actually gets a finer texture -- those peaks become smaller. There's no one right kind of brush to apply it with, but it's good to have several sizes of flat brushes. I've used stiff bristled brushes. I've used foam. I've used fingers.
I think that most punch-out plywood kits can benefit from the application of a textured compound -- not just the Tudors, but also the Painted Ladies and other Victorian extravaganzas. The problem with inexpensive punch-out plywood is that it tends to look like inexpensive punch-out plywood. It often has a large out-of-scale grain. (Also, who builds a real house out of huge sheets of plywood?)
DecoArt Craft Stucco
I think this is the 'heir' to the American Stucco I used a handful of years ago. It doesn't come in the beige and ivory and rose tones -- no, you need to paint it.
The new line also includes a 'glass' compound which might give those leaded glass windows a more authentic texture.

Creating a More Realistic Roof
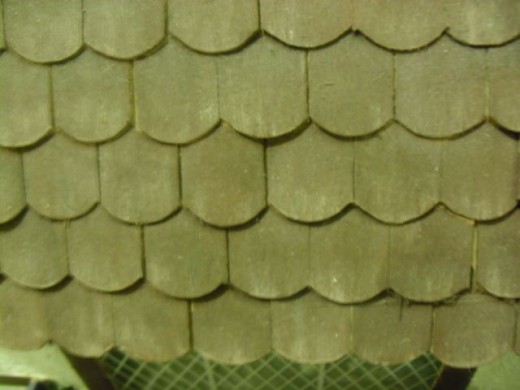


 before you attempt to paint the shingle.
Here it is very important to paint in a downward")

Materials:
- Medium to dark craft paint - a chocolate brown will work well
- Light craft paint
- Dollhouse shingles
Tools:
- Flat soft bristled brush or sponge applicator
- Flat stiff bristled brush
- Sandpaper
Instructions:
1. Sand your shingles. You may be tempted to pull out a little pair of scissors and trim some of those splinters -- go for it!

2. Give your shingles a relatively solid coat of dark paint. Use your soft bristled brush, or spounce it on with a sponge applicator. The color doesn't need to be perfectly even. This is a step your grade schooler could carry out.
 before you attempt to paint the shingle. Here it is very important to paint in a downward")
3. Drybrush a lighter color with your stiff bristled brush. Use an almost dry brush. Wipe most of the paint off on newsprint (or on the back of your sandpaper!) before you attempt to paint the shingle.
Here it is very important to paint in a downward direction. This coat of paint should be wispy and somewhat transparent.
Sugarplum Cottage Kit
There it is! Before it was Mount Rainier Primary School, it was the Sugarplum Cottage kit: sheets of plywood and rows of little shingles. The Sugarplum is one of the easiest to put together kits, and if it's 'upgraded' with stucco and such, it can be lovely.
The half timber pattern is cardboard -- a whole wall can be "half timbered" in one piece. The trim could be flimsy, but if it's finished and applied to the walls with a good glue, it will hold up for many years. Mine shows no wear after more than a decade.
Before I glued the trim on, I laid it out on newsprint and painted it chocolate brown. I don't believe I finished it with varnish or Mod Podge decoupage medium, but that would add additional durability.

I didn't take step-by-step pictures of the construction of my Sugarplum Cottage a decade ago, but I did want to share this tutorial from More Minis at Blogspot. You can even see the cardboard trim all laid out and newly painted.
Other Beginner Dollhouses
Here are more beginner dollhouse kits in 1:12 scale. They're in the $20 to $40 range.

A Few Words About Dollhouse Scale
And Why You Shouldn't Start Too Small
The most common dollhouse scale is 1:12; one inch stands for a foot out there in the real world. There are other scales like 1:24 (or half-scale). I don't like to deviate from 1:12. One reason is cost. Look through a miniatures catalog, and it seems that half scale miniatures are cheaper. Here appearances are deceiving! It's easier to improvise and create in the traditional scale. Even some items sold for Christmas decorating and crafting will work in a 1:12 scale. It's harder to find or improvise smaller scale items. Of course smaller items are harder to craft.
Displaying an In-process Dollhouse
Click thumbnail to view full-size


Some people want to do the outside as quickly and simply as possible so they can focus on the interior design. But if you are on a budget and/or doing a lot of the décor by hand, there can be advantages to pulling together the exterior first -- it will go together quickly.
Depending on what your living/ display space is like, it can look nicer to have the exterior facing the main part of the room. I've always displayed mine that way.
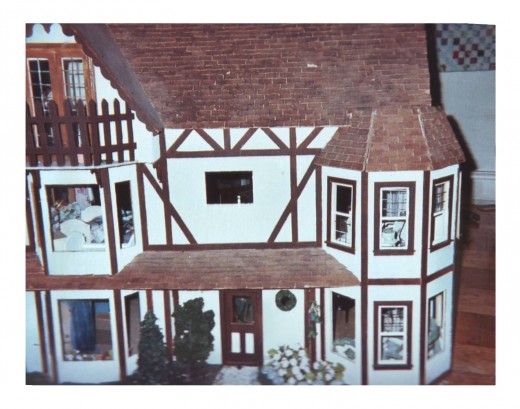
The dollhouse doesn't have to be completely finished to look nice as décor. Here's a not-quite finished Harrison exterior. Most of the shingles have been cut from cork and painted with a dilute brown acrylic, but you'll see a spot that has been stained brown and is still waiting for shingles. (The other picture shows what the house looked like when it first came home from the thrift store. It was quite the fixer upper.)
Onwards and Inwards
Beginning to Craft the Interior
When it comes to filling up your living space with handmade items, begin with the crafts you know. My Kentucky 'kin' include quilters and crochet fanatics. I learned how to piece a bow tie quilt in full-scale life, but trying to crochet... well, that turned my head and my yarn into knots. Just because something is smaller doesn't mean it's easier!
The dollhouse scale bow tie quilt below was one of my early projects. When there are a few intricate, handmade items, people tend to ooh and aah -- even though some items in the display may be commercial or more crudely improvised.


Building a Dollhuse for the First Time: Tips from Real Good Toys
Real Good Toys is a big name in the dollhouse kit industry. They specialize in more intricate and expensive kits, but most of the tips here apply to all.
- Real Good Toys
Some tips... and some inspiration.


